Fixing Real Client IP on Nginx When Using Cloudflare + Linode NodeBalancer

Why your logs suddenly show 192.168.255.x — and how to fix it properly

When everything sits behind Cloudflare, real-IP handling in Nginx is usually straightforward, trust Cloudflare’s IP ranges, read CF-Connecting-IP, and $remote_addr becomes the actual visitor’s address.

That simplicity disappears the moment you introduce a Linode NodeBalancer in front of your server.

Suddenly your logs show something like:

192.168.255.46 - - “GET / HTTP/1.1”

No visitor IP. No geolocation, No rate-limit accuracy, No security context.

This article breaks down why this happens and how to build a clean, universal, future-proof Nginx real-IP setup that works for

  • Sites behind Cloudflare only
  • Sites behind Cloudflare + Linode NodeBalancer
  • Mixed environments with many domains and applications

This is the configuration I now use across my infrastructure — simple, robust, and consistent.

The Real Cause, One Missing Trusted Hop

Let’s look at what changes when you add NodeBalancer.

Before

Visitor → Cloudflare → Nginx

Nginx sees

  • Source IP > Cloudflare edge
  • Visitor IP > inside header CF-Connecting-IP

Everything works After

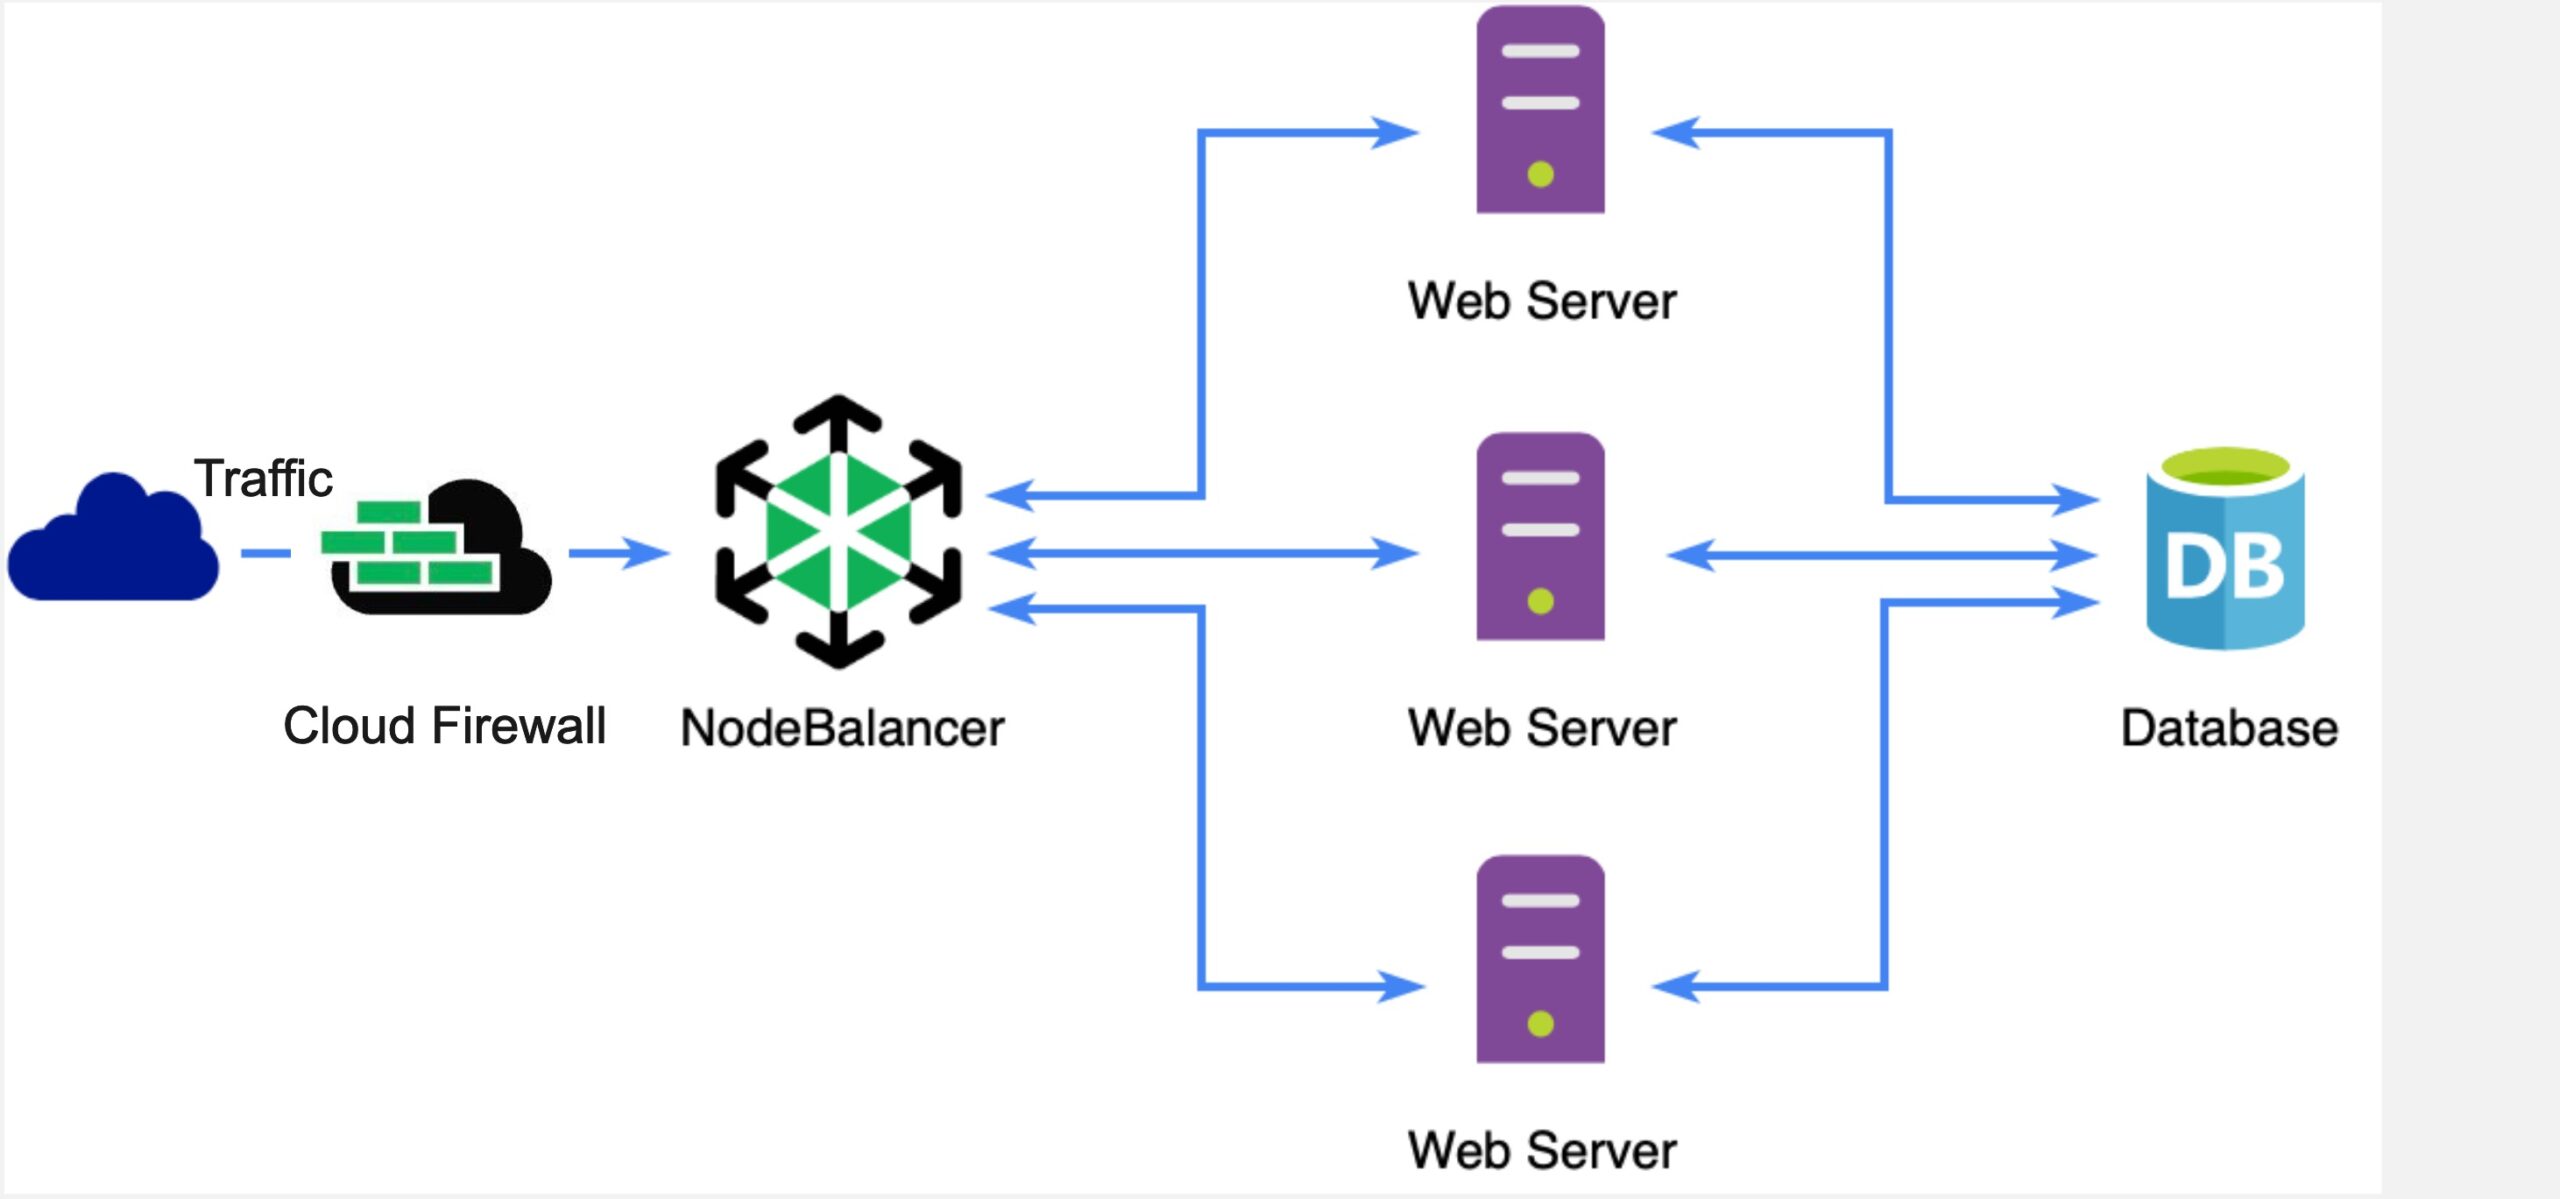
Visitor → Cloudflare → Linode NodeBalancer → Nginx

Nginx now sees:

  • Source IP: 192.168.255.x (private LB network)
  • Cloudflare header exists, but is ignored

Why?

Because Nginx will only trust forwarded IP headers when the source is listed in set_real_ip_from.

Cloudflare is trusted, but the NodeBalancer private network isn’t, so Nginx throws away the real IP and uses the LB’s address instead.

The fix is shockingly simple, but must be done properly.

The Correct Strategy, Centralize the Trust Logic

Instead of putting real-IP logic inside each site config, it’s far cleaner to:

  • Place all trusted proxies (Cloudflare + NodeBalancer) in a single global config
  • Extract visitor IP using only one directive, globally
  • Keep per-site configs minimal and focused on proxying upstream

This will ensures

  • All domains behave consistently
  • Adding new sites requires zero IP logic
  • Changes to Cloudflare/Linode ranges only happen in one place
  • Backends always receive the correct visitor IP

Step 1, Create a Global Real-IP File

/etc/nginx/conf.d/real-ip.conf

# Trust Linode NodeBalancer private network
set_real_ip_from 192.168.255.0/24;

# Trust Cloudflare IPv4 ranges
set_real_ip_from 173.245.48.0/20;
set_real_ip_from 103.21.244.0/22;
set_real_ip_from 103.22.200.0/22;
set_real_ip_from 103.31.4.0/22;
set_real_ip_from 141.101.64.0/18;
set_real_ip_from 108.162.192.0/18;
set_real_ip_from 190.93.240.0/20;
set_real_ip_from 188.114.96.0/20;
set_real_ip_from 197.234.240.0/22;
set_real_ip_from 198.41.128.0/17;
set_real_ip_from 162.158.0.0/15;
set_real_ip_from 104.16.0.0/13;
set_real_ip_from 104.24.0.0/14;
set_real_ip_from 172.64.0.0/13;
set_real_ip_from 131.0.72.0/22;

# Trust Cloudflare IPv6 ranges
set_real_ip_from 2400:cb00::/32;
set_real_ip_from 2606:4700::/32;
set_real_ip_from 2803:f800::/32;
set_real_ip_from 2405:b500::/32;
set_real_ip_from 2405:8100::/32;
set_real_ip_from 2a06:98c0::/29;
set_real_ip_from 2c0f:f248::/32;

# Extract true visitor IP
real_ip_header CF-Connecting-IP;
real_ip_recursive on;
Code language: PHP (php)

This becomes your single source of truth.

You never repeat these lines in any site config again.

Step 2, Make Sure Nginx Loads It Globally

Your /etc/nginx/nginx.conf should have

include /etc/nginx/conf.d/*.conf;
Code language: PHP (php)

Still inside http {}, add a readable access log format so you can verify the result

log_format main '$remote_addr - $http_cf_connecting_ip - $http_x_forwarded_for - $host "$request"';
access_log /var/log/nginx/access.log main;
Code language: JavaScript (javascript)

This makes debugging clear and transparent.

Step 3, Keep Per-Site Configs Clean and Minimal

Your site config should not contain any real-IP directives anymore.

A typical TLS vhost becomes

server {
    listen 443 ssl;
    server_name example.com;

    ssl_certificate     /var/app/ssl/example.com.crt;
    ssl_certificate_key /var/app/ssl/example.com.key;

    access_log /var/log/nginx/example.com.access.log;

    location / {
        proxy_pass http://localhost:3000;

        proxy_set_header Host $host;
        proxy_set_header X-Real-IP $remote_addr;
        proxy_set_header X-Forwarded-For $proxy_add_x_forwarded_for;
        proxy_set_header X-Forwarded-Proto $scheme;

        proxy_set_header Upgrade $http_upgrade;
        proxy_set_header Connection "upgrade";
    }
}
Code language: PHP (php)

Simple, Deterministic and Zero duplication.

Step 4, If You Use NodeBalancer TCP Mode + Proxy Protocol

If you enable “TCP” + “Proxy Protocol v2” on Linode LB, update your listen directive:

listen 443 ssl proxy_protocol;

But do not change the global real-IP logic.

You still want the visitor IP from

CF-Connecting-IP

Proxy Protocol is only useful if you want the Cloudflare edge IP, which is rarely needed for apps.

Step 5, Test the Results

Reload

sudo nginx -t
sudo systemctl reload nginx

Then watch the logs:

tail -f /var/log/nginx/access.log
Code language: JavaScript (javascript)

You should now see:

  • $remote_addr = real visitor IP
  • $http_cf_connecting_ip = same IP
  • No more 192.168.255.x

This applies consistently across all domains, whether they use the LB or not.

Final Thoughts

Handling real IPs becomes messy only when multiple proxy layers enter the picture. The mistake most people make is scattering real-IP directives across different site configs.

That works until the first load balancer enters the system, then logs break, security breaks, and analytics break.

By centralizing trust and extracting the real client IP once, you build an Nginx setup that

  • Works cleanly with Cloudflare, Linode NodeBalancer, and with both combined
  • Avoids duplicated logic, keeps every domain consistent and makes future expansion simple

This unified approach keeps your infrastructure predictable and your logs honest, just the way it should be.
Choosing Between n and nvm, The Best Node.js Version Manager for You

When working with Node.js, managing different versions efficiently is essential. Whether you’re running apps on servers or juggling multiple projects locally, a version manager simplifies your workflow.

Two of the most popular tools for this job are n and nvm. Each has its strengths, and choosing the right one depends on your environment and use case.

What Are They?

  • n: A Node.js version manager designed for simplicity. It installs and manages Node.js system-wide, making it ideal for production servers or global development environments.
  • nvm: A per-user Node.js version manager that works at the shell level. It allows you to install multiple versions of Node.js in your user directory and switch between them seamlessly.

How to Install n

n is not typically available from the default Debian repositories. To install it, use the following manual method:

# Update APT and install required build tools
sudo apt update
sudo apt install -y curl build-essential

# Set up user-level environment for n
echo 'export N_PREFIX="$HOME/.n"' >> ~/.bashrc
echo 'export PATH="$N_PREFIX/bin:$PATH"' >> ~/.bashrc
source ~/.bashrc

# Make sure ~/.n/bin exists
mkdir -p ~/.n/bin

# Download and install n to local user path
curl -L https://raw.githubusercontent.com/tj/n/master/bin/n -o ~/n
chmod +x ~/n
mv ~/n ~/.n/bin/n

# Install the latest LTS version of Node.js
n lts

# Verify the installation
n --version
node -v
which node
Code language: PHP (php)

This will install the latest LTS version of Node.js and place the n tool in your global PATH.

Once n is installed, you can begin using it to manage Node.js versions system-wide.

Key Differences

Featuren (Simple & Fast)nvm (Project-Focused)
ScopeSystem-wide (global)Per-user (local)
Ease of UseSuper fast and minimalRequires shell integration
Best ForServers, global use, simplicityDevelopers working on many projects
Project .nvmrc SupportNot built-inYes (great for per-project version pinning)
SpeedVery fast version switchingSlightly slower due to shell dependency
DependenciesNoneRequires .bashrc/.zshrc setup
Multi-user SupportYes (all users share versions)No (each user installs their own)

Why Use n?

If you’re deploying Node.js apps on a server, managing containers, or just want to get things done quickly, n is a great choice. It doesn’t require any profile modification, and switching Node versions is instant.

n 12       # Installs and switches to Node.js v12
n lts      # Switch to the latest LTS version
n latest   # Install and use the latest available Node.js
n 18       # Install Node.js v18
Code language: PHP (php)

After installation, n keeps all installed versions available. To list them:

n
# You'll get an interactive list like:
#   o 12.22.12
#     14.21.3
#     16.20.2
#   o 18.17.1
# Use up/down arrows to choose a version to activate
Code language: PHP (php)

To remove older versions and free up space:

n prune

To re-use a specific version later:

n 14

To reinstall and recompile a specific version:

n reinstall 16.20.2
Code language: CSS (css)

To install a version without switching to it:

n add 14.21.3
Code language: CSS (css)

With n, you control your environment system-wide with minimal effort — no need to tweak shell profiles or source files every time.

Why Use nvm?

For local development, especially when working on multiple projects with different Node versions, nvm shines. It supports .nvmrc files, which makes team collaboration and version consistency easier.

nvm install 18  # Installs Node.js v18
nvm use         # Uses the version specified in .nvmrc
Code language: CSS (css)

Which One Should You Choose?

  • Use n if:
    • You need to manage Node.js globally (e.g., on a server or CI/CD system).
    • You prefer simplicity and speed.
    • You’re setting up Docker or system-wide environments.
  • Use nvm if:
    • You’re working across multiple Node.js projects.
    • You want to isolate Node.js versions per user or project.
    • You rely on .nvmrc for team collaboration.

Final Thoughts

Both n and nvm are excellent tools. If you’re looking for speed and ease of use, go with n. If you need per-project flexibility and development isolation, nvm is the better choice.

For developers or sysadmins who’ve had frustrating experiences with nvm, n can feel like a breath of fresh air, quick, reliable, and easy to maintain.

Choose the one that fits your workflow and enjoy smoother Node.js development.

How to Install Node.js v20.x on Debian 12

Node.js has become a critical component for building fast, scalable web applications. If you’re using Debian 12 and want to install the latest version of Node.js, such as v20.x, here’s a quick guide to get you started.

Step 1,Update Your System

Before installing Node.js, it’s always a good idea to ensure your system is up-to-date. You can do this by running:

sudo apt update && sudo apt upgrade -y

This will ensure you have the latest security patches and updates.

Step 2, Install the Required Dependencies

To install Node.js, we need to install a few prerequisite packages. These will allow Debian to manage new repositories and downloads:

sudo apt install curl software-properties-common -y

Step 3, Add the NodeSource Repository

Node.js v20.x is not available in the default Debian repositories, so we’ll need to use NodeSource. Run the following command to add the NodeSource repository for Node.js v20.x:

curl -fsSL https://deb.nodesource.com/setup_20.x | sudo -E bash -Code language: JavaScript (javascript)

This command downloads and sets up the necessary repository for Node.js.

Step 4, Install Node.js

Now that the NodeSource repository has been added, you can install Node.js v20.x by running:

sudo apt install nodejs -y

This command will install both Node.js and npm (Node.js package manager).

Step 5, Verify Installation

Once installed, you can verify the installation of Node.js and npm by checking their versions:

node -v
npm -v

You should see something like:

v20.x.xCode language: CSS (css)

and for npm:

x.x.xCode language: CSS (css)

This means Node.js and npm have been successfully installed on your Debian 12 system.

Step 6, Optional – Install Build Tools

For some Node.js packages, you may need to install additional build tools. You can install them by running:

sudo apt install build-essential -y

These tools will allow you to compile native Node.js modules.

Step 7, Managing Node.js Versions (Optional)

If you ever want to manage multiple versions of Node.js, you can use nvm (Node Version Manager). However, if you installed Node.js using NodeSource, you are already using the latest stable version.

To install nvm, run the following:

curl -o- https://raw.githubusercontent.com/nvm-sh/nvm/v0.39.3/install.sh | bashCode language: JavaScript (javascript)

You can now install and switch between different Node.js versions easily with nvm.

By following these steps, you should have Node.js v20.x up and running on your Debian 12 system. Node.js brings a powerful environment for building scalable network applications, and now you’re all set to start developing!

Happy coding!