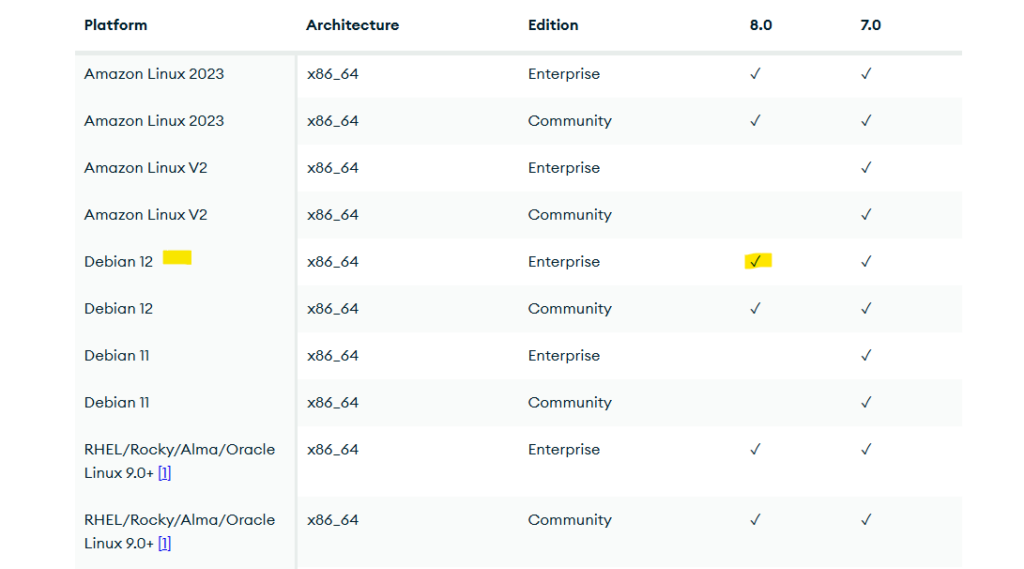
On paper, it’s not the most straightforward combination. MongoDB hasn’t officially blessed Debian 13 yet, so you don’t just copy a line from the docs and call it a day.
You have to be a little more deliberate, use the Debian 12 (bookworm) repository, add the key properly, let apt complain once, then teach it to trust what you’re doing.
It’s a small journey, but that’s exactly the kind of technical ritual that can bring clarity when everything else feels scattered.
There’s a certain peace in doing things step by step. First you clean old mistakes. Then you lay a fresh base.
Then, finally, you turn the service on and watch it run, and somewhere between sudo rm and systemctl status, you realize this is not just about a database server. It’s also about reclaiming a tiny piece of control over your day.
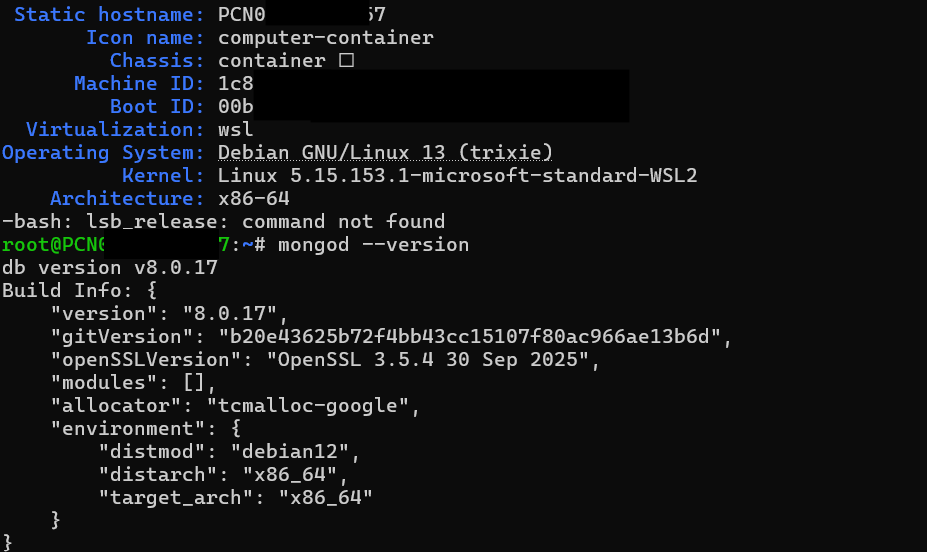
In case you want to walk the same path, here are the exact steps I used to make MongoDB 8.0 run happily on Debian 13 Trixie inside WSL, with authentication enabled and ready to be used from apps or tools like MongoDB Compass.
Step 1, Clean up any broken MongoDB repository
Before anything else, I cleaned up old, half-configured MongoDB entries. That’s the technical version of clearing the desk before starting new work.
In the terminal
sudo rm /etc/apt/sources.list.d/mongodb*.list 2>/dev/null
sudo rm /usr/share/keyrings/mongodb-server-8.0.gpg 2>/dev/null
sudo apt update
Code language: JavaScript (javascript)
If apt was complaining about an unsigned MongoDB repo or a missing keyring file before, this usually stops that noise.
It’s like telling the system, “Forget everything you think you know about MongoDB. We’re starting over.”
Step 2, Create the keyring and import the MongoDB 8.0 key
Next, I created the keyring directory and imported the official MongoDB 8.0 GPG key. This is what lets apt verify that the packages it downloads are legit.
sudo install -d -m 0755 /usr/share/keyrings

curl -fsSL https://pgp.mongodb.com/server-8.0.asc | \
  sudo gpg --dearmor -o /usr/share/keyrings/mongodb-server-8.0.gpg
Code language: JavaScript (javascript)
Then I checked that the file actually exists
ls -l /usr/share/keyrings/mongodb-server-8.0.gpg
When that file is there, it feels like placing a real key in the right drawer. You know later systems will depend on it, but right now it’s just a quiet building block.
Step 3, Add the MongoDB 8.0 repository (bookworm on Trixie)
MongoDB doesn’t yet ship a repository specifically labeled for Debian 13 Trixie, so the trick is to use the Debian 12 (bookworm) repo. It’s not officially perfect, but for a development environment in WSL, it works.
I added this line to a new .list file
echo "deb [ signed-by=/usr/share/keyrings/mongodb-server-8.0.gpg ] http://repo.mongodb.org/apt/debian bookworm/mongodb-org/8.0 main" | \
  sudo tee /etc/apt/sources.list.d/mongodb-org-8.0.list > /dev/null
Code language: PHP (php)
Then just to be sure, I read it back
cat /etc/apt/sources.list.d/mongodb-org-8.0.list
Code language: PHP (php)
One simple line. A tiny bridge between a database vendor and a rolling Debian release.
Step 4, Update apt and install MongoDB 8.0
Now, the familiar moment of truth
sudo apt update
This time, apt ran without yelling about unsigned repositories or missing keyrings. That’s when you know the foundation is finally solid.
Then came the main installation
sudo apt install -y mongodb-org
At this point, MongoDB 8.0 is on the system, but not yet part of the everyday rhythm. That comes with services and configuration.
Step 5, Start and enable mongod as a service (inside WSL)
Debian 13 in WSL can run systemd if it’s enabled in your WSL configuration. Assuming systemd is available, I wired MongoDB into it:
sudo systemctl enable --now mongod
systemctl status mongod
Seeing active (running) on that status line is always a small, quiet win. Not dramatic. Just satisfying.
If systemd isn’t enabled in your WSL setup yet, you can either enable it in /etc/wsl.conf and restart WSL, or temporarily run MongoDB manually:
sudo mongod --config /etc/mongod.conf
But the long-term comfort comes when systemctl takes over and you don’t have to think about it every time you open a shell.
Step 6, Check that MongoDB is listening on the expected port
To make sure MongoDB is actually listening, I checked the open ports:
ss -tulpen | grep 27017
You want to see something that shows LISTEN on port 27017, usually bound to 127.0.0.1 or 0.0.0.0. That’s the heartbeat of the database, running quietly in the background, waiting for someone to talk to it.
Step 7, Configure bindIp and basic network behavior
Next, I opened the main MongoDB configuration file:
sudo nano /etc/mongod.conf
In the net section, there’s usually something like this:
net:
  port: 27017
  bindIp: 127.0.0.1
Code language: CSS (css)
If I only want to connect from inside WSL and from the Windows host using localhost, 127.0.0.1 is enough and safer.
If I want MongoDB to be reachable from other machines on the network (for example, another VM), I change it to:
net:
  port: 27017
  bindIp: 0.0.0.0
Code language: CSS (css)
That’s more open, so it should be combined with proper firewall rules on Windows and on the host environment. After editing, I restarted the service:
sudo systemctl restart mongod
systemctl status mongod
This is the moment where the database quietly accepts its role: local only, or open to a wider world.
Step 8, Enable authentication and create an admin user
By default, MongoDB often starts in a mode where anyone who can connect can do anything. That might feel convenient, but it’s like leaving your house door unlocked because it’s easier than carrying keys.
So I created a dedicated admin user and turned on authorization.
First, I opened the Mongo shell:
mongosh
Inside the shell, I switched to the admin database and created a user
use admin

db.createUser({
  user: "admin",
  pwd: "change_this_to_a_strong_password",
  roles: [
    { role: "root", db: "admin" }
  ]
})
Code language: CSS (css)
Then I exited:
exit
Code language: PHP (php)
Next, I enabled authorization in the config file:
sudo nano /etc/mongod.conf
And added or edited this section:
security:
  authorization: enabled
Then I restarted the service again
sudo systemctl restart mongod
Now, MongoDB will not let anyone do anything without logging in properly. It’s a small additional step every time you connect, but it’s also a statement, this data matters.
Step 9, Test login with authentication
To make sure everything worked, I logged in again, this time with credentials
mongosh -u admin -p --authenticationDatabase admin
After entering the password, I could run
db.runCommand({ connectionStatus: 1 })
Code language: CSS (css)
and see that the user was authenticated with roles. That’s the point where MongoDB stops being just “installed” and becomes “ready”.
Step 10, (Optional) Connect from Windows using MongoDB Compass
Because this is running inside WSL, it’s usually possible to connect from Windows tools like MongoDB Compass using localhost:27017.
A typical connection string looks like this
mongodb://admin:change_this_to_a_strong_password@localhost:27017/admin
Code language: JavaScript (javascript)
From there, collections, indexes, and documents are just a few clicks away. But the real work was everything that happened before this connection string even made sense.
Ending …
On the surface, all of this is just about installing a database server. A few lines in a config file. Some imports, a repository, a service, a user. Nothing grand.
But there’s a quiet kind of meaning in small technical victories like this. When the world feels noisy and chaotic, it’s comforting to have a place where cause and effect still line up.
It’s a good text, but painfully obvious it was written with AI. Doesnt work with Debian 13.
MongoDB on WSL Debian 13 Trixie